I recently picked up weightlifting again and found myself wanting a particular way to visualize and contextualize my progress, so I prototyped a small app.
TL;DR: check it out.
I lift?
Coming out of college in 2014 I started messing around with weightlifting in the gym. The main motivation was just to hang out with friends who had gotten into it, so I never made all that much progress, but it always made me feel good and proud. As anyone who’s gotten into it could attest, there’s a particular, and particularly pleasing, chemical soup that permeates you when you do heavy resistance training.
Over the past decade I’ve come back to it in fits and starts. Always a great thing, but never really stuck, as it goes.
I hadn’t lifted in about 2 years when I started again this January. I was about to go away for two months on a physically demanding trip and I wanted to use that as motivation to get serious. As part of getting serious, I went about setting goals for myself. It turns out that open-ended progress just doesn’t keep me motivated, but setting some date and putting it in my calendar, even if only I know about it, goes a long way to keep me honest. In fact, a very similar calendar entry is pushing me to publish this blog post today.
Setting my goals
The specific program I’ve been returning to time and again is called StrongLifts 5x5. StrongLifts is a program that focuses on doing 5 sets of 5 reps of 5 core lifts: squat, bench press, barbell row, overhead press, and deadlift. By the time I was ready to set my super serious goals I had already spent about 6 sessions reacclimatizing to the gym, just letting my muscles shake off their rust and ice, and I had started to find where my weights for each of the StrongLifts lifts were:
- Squat: 160 lb
- Bench press: 100 lb
- Barbell row: 100 lb
- Overhead Press: 85 lb
- Deadlift: 145 lb
Impressively low! Regardless, as I was looking ahead at a strict 3x a week schedule where I’d try to make as much progress as I could I actually became concerned about the balance of strength across my body. I knew I hadn’t lifted before this in a long while, so I wondered if it was possible that some core muscle group got disproportionally weaker compared to the rest of my muscle groups? Put another way: if I was stronger in, say, squats and moving higher weight there, but I was comparatively weak in, say, deadlifts, could that lead to injury?
So I did some research on what the right balance between these lifts might be. It didn’t seem like this was a thing that was talked a lot about in lifting communities, but I was able to cobble together some sources and average out some percentages to get the following set of proportions comparing each lift to squat.
- Deadlift should be 115% of squat.
- Overhead press should be 45% of squat.
- Bench press should be 70% of squat.
- Barbell row should be 70% of squat (should be about the same as bench).
I was satisfied enough with these numbers (though who knows how they hold up with respect to different body weights, body types, or at higher weights), so I started using them to inform goal weights. I wanted to set a squat goal at 185 lbs, since that’s a nice clean 45 lb plate + 25 lb on each side, and then set the goal weights for the other lifts using the ideal proportions. This gave me the following values for my first milestone:
- Squat: 185 lb.
- Deadlift: 115% of 185 lbs is 212 lb, let’s call that 215 lb (increments of 5 lb are standard)
- Overhead press: 45% of 185 lbs is 83 lb, let’s call that 85 lb.
- Bench press: 70% of 185 lbs is 129.5 lb, let’s call that 130 lb.
- Barbell row: same as bench, 130 lb.
My plan was to achieve those weights on each lift, and wait to progress any further on any lift until every lift had hit their target. This gave me confidence that I would progress in a balanced, safe way.
Another piece of arithmetic I was curious to perform was how long this would take me. In StrongLifts 5x5, if you don’t fail at a weight, you move up, otherwise you try again next time. You move up 5 lb for all lifts except for deadlift, where you move up 10 lb. You squat every session, and you do each of the others only every other session. So to move up 20 lb in squat, you need to have 4 sessions without failure. To move up 20 lb in bench press, you need 4 bench press sessions without failure, which is 8 overall sessions since you only do bench every other session. To move up 20 lb in deadlift, you need 2 deadlift sessions, which is 4 overall.
So at my numbers, that looks like:
- Squat: 185 lb goal weight minus 160 lb current weight is 25 lb to go, 25 lb divided by 5 lb per session without failure is 5 sessions to go.
- Deadlift: 185 lb - 145 lb = 40 lb to go, meaning 4 deadlift sessions at 10 lb each, meaning 8 overall sessions.
- Overhead press: 85 lb - 85 lb = 0, already there.
- Bench press: 130 lb - 100 lb, 6 bench sessions, 12 overall.
- Barbell row: same as bench, 6 / 12.
After that milestone, I set another one with squat at 225 lb (a nice clean couple of 45 lb plates on either side) and did the same math out at the value. Everything calculated out, here’s a summary of all the information I was interested in:
| Lift | Current | Ideal % of Squat | Milestone 1 | M1 sessions to go | Milestone 2 | M2 sessions to go (after M1) |
|---|---|---|---|---|---|---|
| Squat | 160 lb | 100% | 185 lb | 5 sessions | 225 lb | 8 sessions |
| Deadlift | 145 lb | 115% | 215 lb | 7x2=14 sessions | 255 lb | 4x2=8 sessions |
| Overhead Press | 85 lb | 45% | 85 lb | 0 sessions | 100 lb | 3x2=6 sessions |
| Bench Press | 100 lb | 70% | 130 lb | 6x2=12 sessions | 155 lb | 5x2=10 sessions |
| Barbell Row | 100 lb | 70% | 130 lb | 6x2=12 sessions | 155 lb | 5x2=10 sessions |
As I was in the gym lifting, everytime I looked at the StrongLifts 5x5 app to update values, I found myself going back into my note-taking app and looking at these values. I knew this was information I really valued because I had to dig to get it every time. I cared a lot about my progress to the goal, as well as how my current balance is. I wanted to see where I was contextualized in these ways.
At this point, my developer senses started going off: if something’s complex enough to be a useful Excel spreadsheet, it might be a good candidate for an app.
And an app can bring something more to the table, over just the raw calculations. I caught myself visualizing in my imagination something very like the tick mark line visualization I put in the prototype.
So, being a developer, I prototyped a thing that I hoped could show people without having to tell them what I was envisioning.
The app
Before getting into it I want to say, and perhaps this is obvious – I’m not a vis guy. I don’t find myself having instincts or insights into how to make a thing look pretty. But I do find myself having instinctual thoughts on what the user will want to know and want to do, and how they might want to do it. Whether they’re good thoughts or not, who knows, but at least they come to me, and I had a few of them for this app.
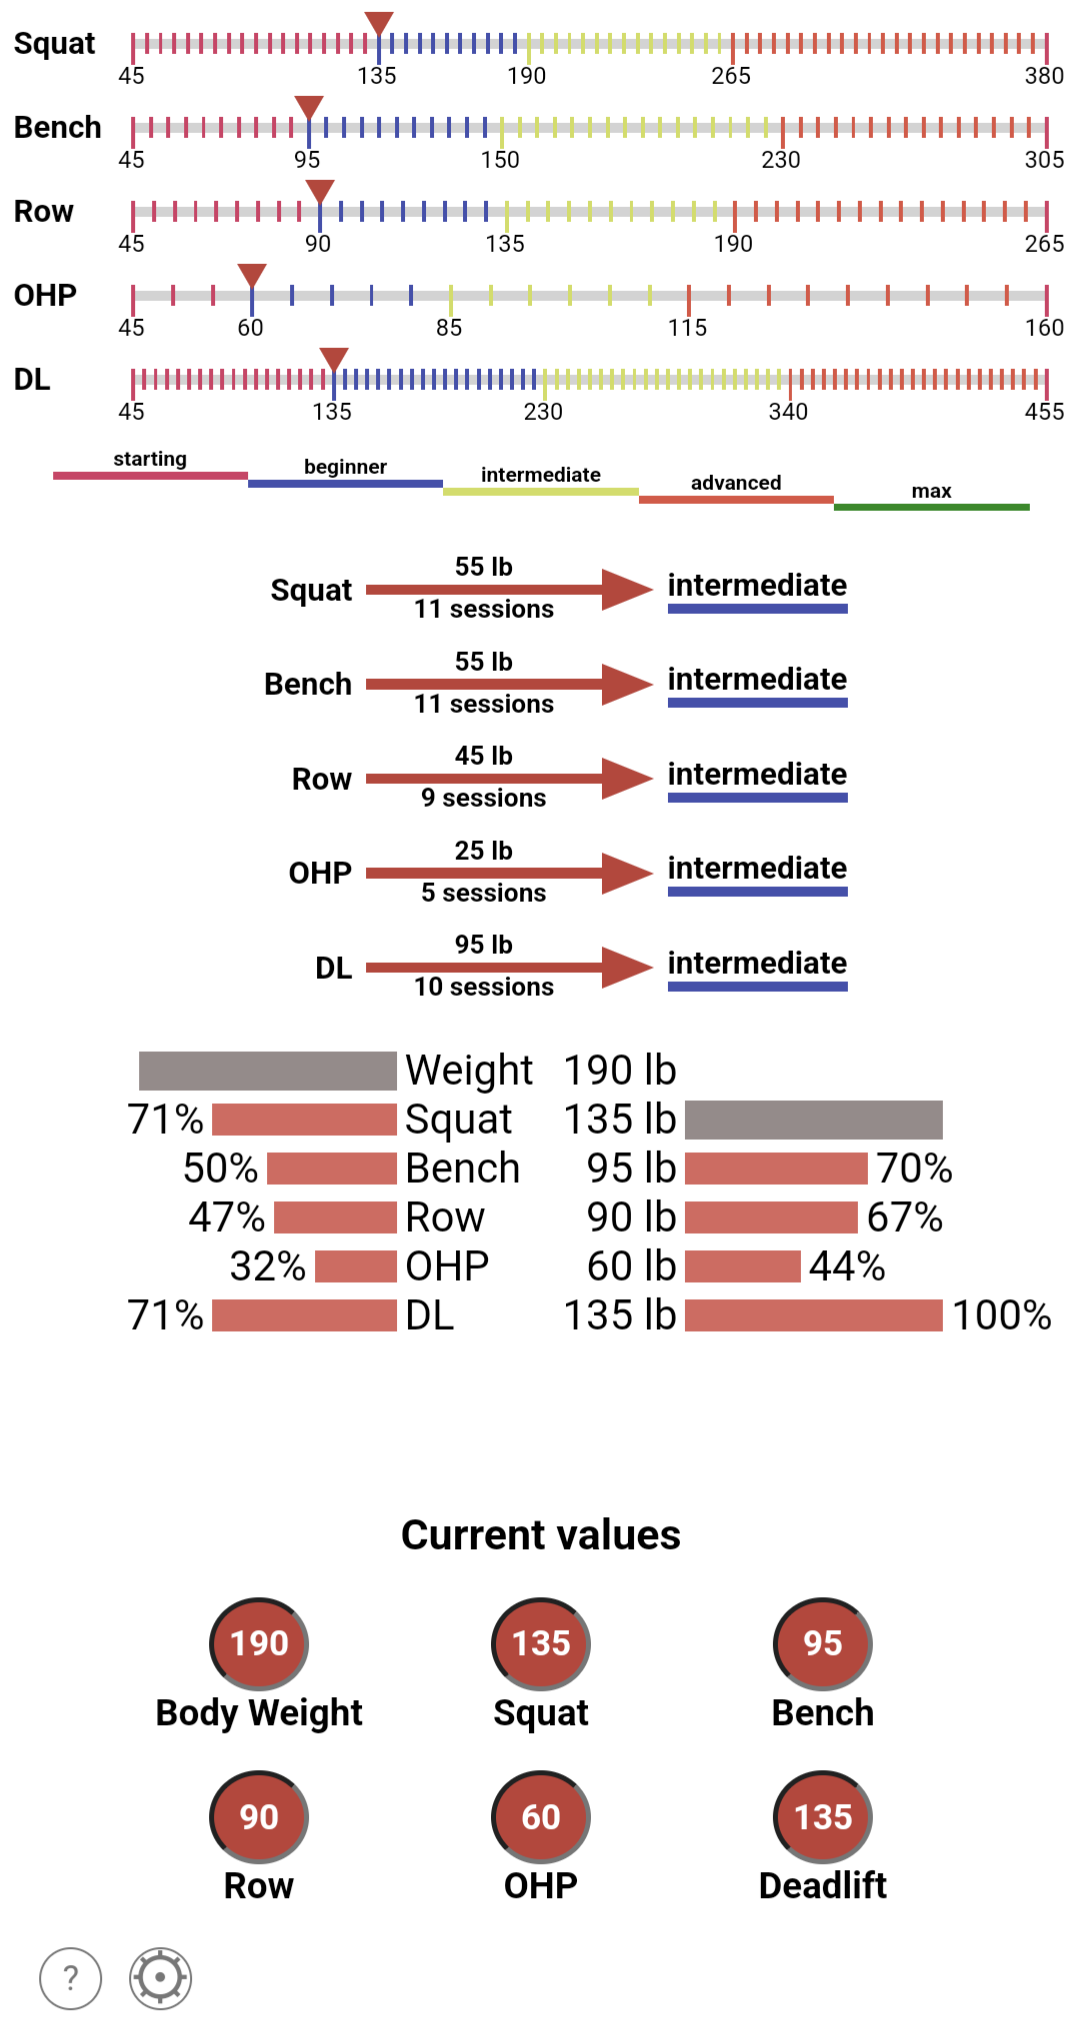
The screenshot shows the following on the main app page:
- At the top, for each lift you see where you currently lie in relation to your goals, denoted by the colored zones. In the screenshot, along the Squat line the 190 shows where you’ll hit your “intermediate” goal, which is the zone you’ll be in until you hit your “advanced” goal at 265.
- Below those tick mark lines is a legend showing the colors assigned to each of your goals.
- The thick red arrows below the legend show the distance to go, both in weight and sessions (without fail), until each lift hits the next goal.
- The double bar graph shows the proportions comparing your lift weights to your bodyweight (left), and comparing your other lifts to squat (right), giving you that information about the “balance” between your muscle groups that I had originally sought out.
- At the bottom, the red circles are inputs where you can update your current values.
The biggest thing I was going for here is the at-a-glance dashboard of it all. You’re seeing the “whole picture”, which is important for that visual contextualization I was seeking. For example, my ambition with the tick mark lines at the top was to give the user a spatial sense, more of a feeling than anything, of where their current weights lie with respect to their goals. There’s the part of your brain that can look at the raw number of “25 lb to go til I hit the ‘advanced’ goal” and understand it mathematically, and then, I believe, there’s a totally different part of your brain, perhaps the part more to do with spatial reasoning, that can feel that information in a totally different way by being able to see it. The existence of pie charts may support this neurological hypothesis.
Another small instinct I followed was about how to make the interaction cost for setting your current values as minimal as possible. Those inputs can be selected and typed into, like any other input. But for whatever reason even that felt like a lot to ask the user to do for my lil’ old app here. So you can also update those values by clicking / pressing and dragging – as you drag to the right or up the value goes up, and as you drag to the left or down the value goes down. I figured this way you don’t even have to change the way you hold your phone, you’re just using your thumb and you never have to type anything.
Setting your own goals
The other big interaction is in the settings modal, which you can access with the settings wheel button on the bottom.
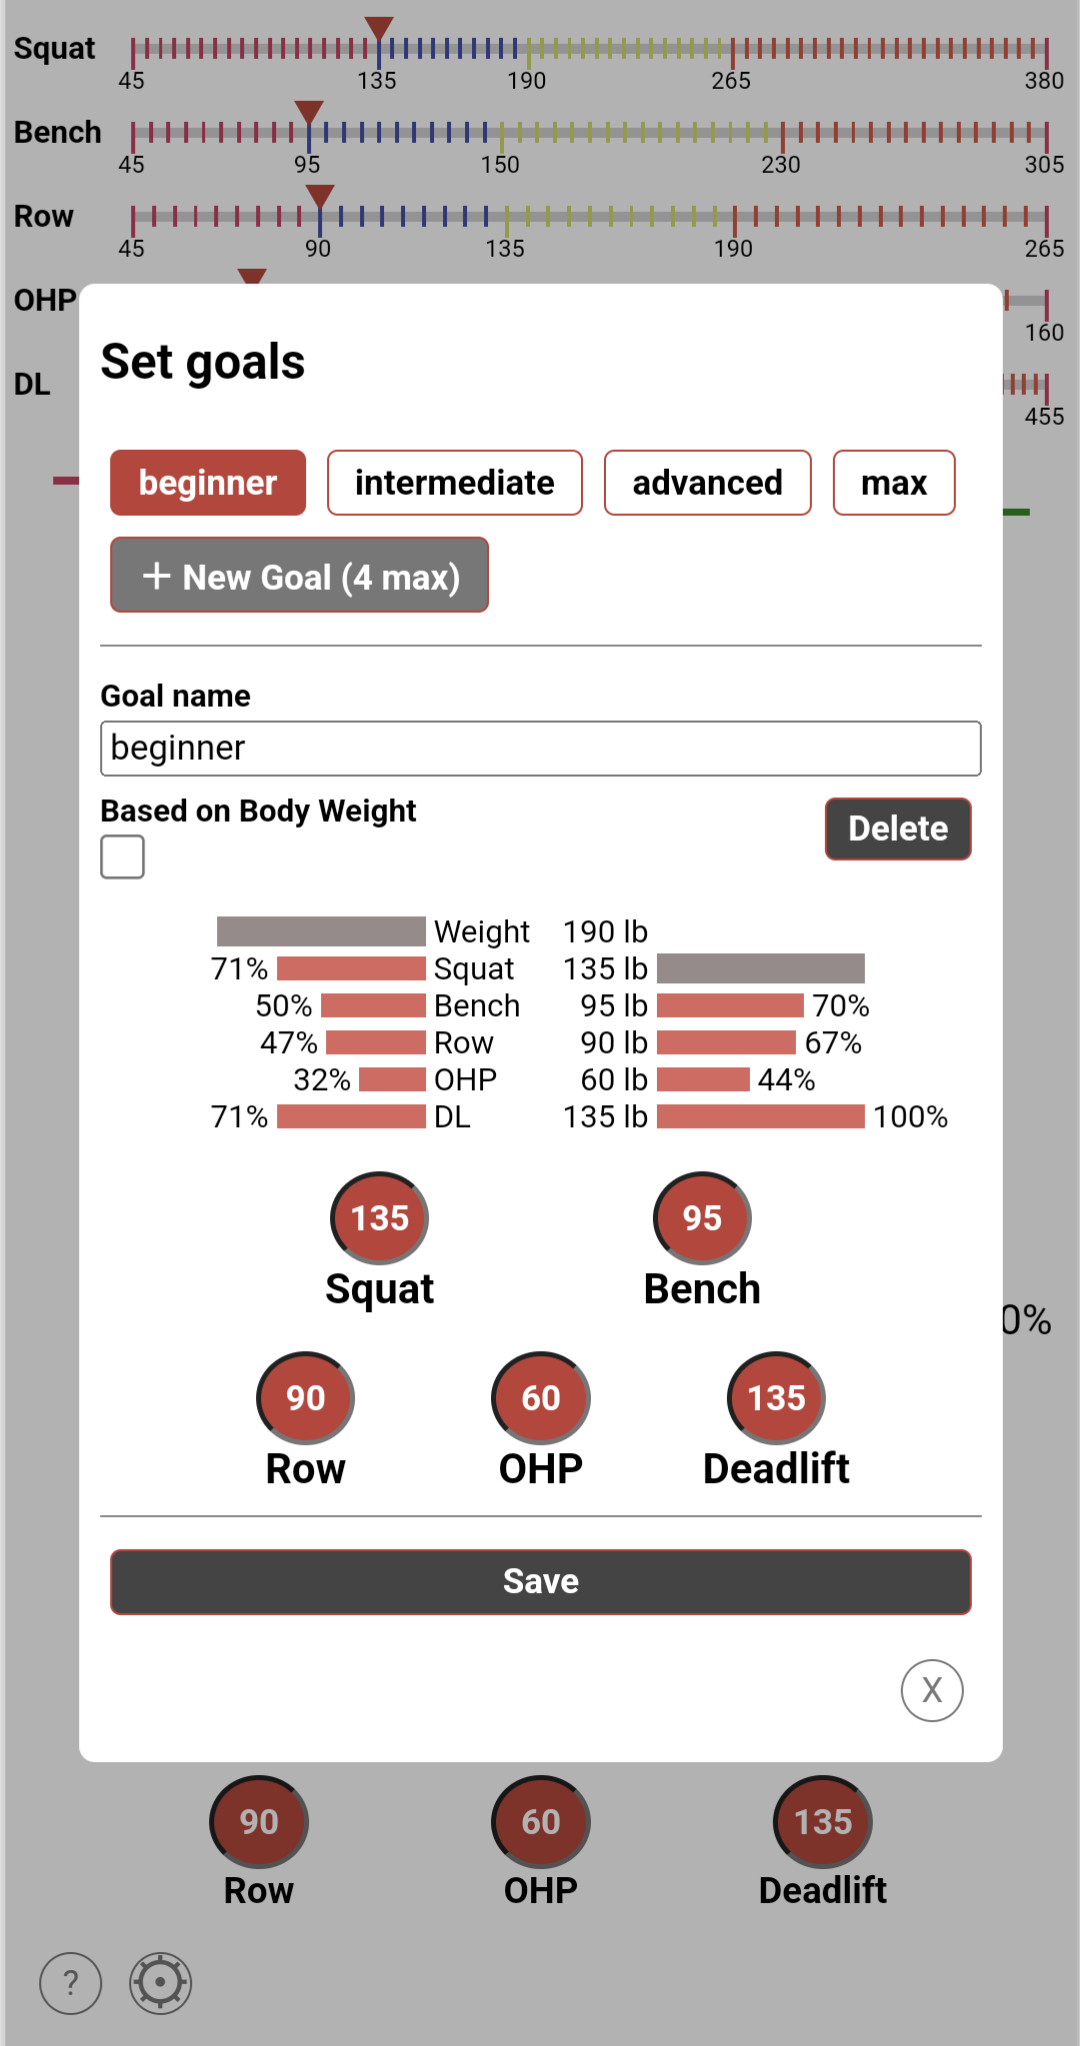
Here, you set your own goals – their names and their weight values for each lift. It shows you the ratio bar graph display for your goal weight values themselves, so you can see what the weight proportions of your actual goal are. You can also set goals as ratios of your bodyweight, that would change if your bodyweight changes, in case you had a goal of, say, bench pressing your bodyweight.
The tech
Check out the repo: GitHub - samgqroberts/lifting-goals: An app for setting and tracking progress toward goals in the 5x5 lifting program.
I chose not to stray from my expertise at all for this in order to focus as much as possible on just the product level prototyping. So I chose React, my bread and butter.
Otherwise, I have almost zero dependencies. No Material UI, no third-party CSS-in-JS solutions. This was actually the first time I went gung-ho on inline styles in React. And you know what? It pretty much worked. The biggest issue is that you can’t define CSS pseudo-classes in inline React styles, so I had to escape-hatch out to a CSS file to hide the spinner buttons on the numeric inputs. The other issue is that the lack of classnames makes working with the Chrome inspector a little tougher. There are no classnames to give semantic labels to the HTML elements, and you can’t update CSS in the inspector and apply it to all instances of the component. But you know what? With hot reloading not even requiring a page refresh these days, the second thing there is much less of an issue. You can just change the CSS values in your code editor and see it propagated to all instances of that component immediately, just as if you were editing in the inspector. All that said, it’s almost certainly a better idea to go with a bonafide CSS in JS solution like Styled Components. I was just trying to keep things lightweight and try out this new strategy.
As far as writing your CSS in JS vs. in CSS files – part of the reason I like React so much is how it consolidates HTML and JS into one uniform, well-typed place. I’ve had to work with Angular over the past couple years and I miss this consolidation so much. Angular has its HTML in these template files that get type checked, mostly, but intellisense has no idea what to do with them, and the “find usages” function in your IDE won’t know how to look in them. And you’re separating out two things that, in my opinion, shouldn’t be separated out. The traditional logic that says they deal with different things, the layout versus the behavior, and therefore there should be some separation holds exactly zero water with me. The harmony of having HTML and JS together in React disproves that wholly to me. You should separate out things that need to be used in multiple contexts, sure, but that’s not what Angular templates are doing.
Anyway… that’s how I feel about CSS too. Give me everything that defines the thing, the Component, in the same place, and let it be as well-typed as it can possibly be, which CSS in JS can do.
The only runtime dependency I ended up adding was superstructjs, a project I’m a big fan of. It offers a DSL that allows you to define data types, then use those types to validate data. The best thing about it, though, is it works so well with TypeScript. You don’t have to manually redefine a TypeScript type for some data type you defined via superstruct – you can automatically derive it. I use this library to perform well-typed ser/de on the user data JSON the app stores in localstorage.
The only dev dependencies I added were to set up my eslint / prettier environment. I have become dependent on never manually fixing code style. The first thing I do on any new project, regardless of language, is set up linting / code style rules (I tend to go with as out-of-the-box / standardized a setup as possible, whatever seems to be the community’s preferences) and set up my VSCode to automatically fix all linting errors on save. This is one place where the machine can and should just do the thing for me.
I didn’t add tests because the cost / benefit of UI testing, which is already skewed in general, is even more skewed in a prototyping context. There needs to be a balance between how much investment we make in any particular module of code vs. how certain we are the module is right, has legs, etc. To borrow a concept from The Lean Startup, which parts of your code correspond to functionality that you have validated learning to support? As this is a prototype, we have almost no validated learning, no certainty in the appropriateness of any feature, and therefore not much confidence in the future of any particular code module. So the benefit in the automated testing cost / benefit curve is fairly low for any bit of code – automatically checking that our code has no changes has less value if the likelihood that we’ll want to change it soon is fairly high. And, as I mentioned, the cost of UI testing (and UI test maintenance) is fairly high, at least with my skills now. And it reaches way higher if you want to cover all aspects of the user interface, including styling, which people usually don’t even bother with, so the cost / benefit curve takes another hit there. All this is to say: no tests for this UI-only prototype.
I feel the need to mention – I love testing. I love Test-Driven Development, I love refactoring under good test coverage, I love investing in a good test harness. If the cost of UI test writing and maintenance was much lower, then I’d definitely have tests alongside even the most uncertain prototype. If the prototype was, say, a Python Flask HTTP server, with its well-defined and easily-programmatically-accessed user interface, then I’d already have decent test coverage for all of the API endpoints even at this stage of development. For that particular cost / benefit curve, writing tests increases my development velocity, even for short-term, scrappy, uncertain stuff, by enabling TDD and letting me see the behavior more clearly. I wish I could have that for frontend development, but I’ve never achieved it.
Reflections
There’s really no good ideas that aren’t ideas that someone saw through to the end… nothing just is so good that it kind of moves itself. A person pushed that boulder up that hill… and you only in getting to the end realize it was a good idea – at the end of it. I’ve had this with scripts – the scripts that end up really great and scripts that end up horrible were equally as hard to make… you just have to keep pushing through to the end to see whether it’s gonna work or not.
– Megan Gans
My traditional creative pattern that’s probably all too familiar to a lot of people has been this: have an idea for a project, get excited about it, start it, then hit the double wall of all the unglamorous work that goes into it plus the creeping doubt that the effort will be worth it. Ultimately I often walk away before any satisfying conclusion.
The unglamorous work is what it is – there will always be a significant amount of unglamorous work along the path of any creative endeavor. That can usually be worked through with discipline and keeping the value of the end goal in mind. But when you start doubting the value, that’s when you end up losing your motivation. I’ve walked away from a lot of projects I was initially excited about because of that doubt.
So when I heard Megan Gans say that quote at this point in episode 64 of The Always Sunny Podcast, I felt like she was talking to me. The idea that you really don’t know whether an idea is good or not until you hit some critical point toward the end of its lifecycle makes a lot of sense to me, intuitively, and the fact that it’s coming from someone as successful in creative endeavors as Megan Gans is very convincing. It directly addresses my biggest de-motivator, that creeping doubt.
I listened to that episode about a third of the way into pursuing this app idea, and it just so happened I was right in the middle of experiencing the doubt. So I decided to try to take the words to heart and finish the darn thing. Get it out the door, write a blog post about it, make sure it was in a showable state, make sure the thing I was going for took some kind of visible form. Her words have been in the back of my mind the whole way.
So, now that I’ve done it and can take a look at it – do I think it’s a good idea? Ehhhhh… ![]() . It’s got a very limited market / use case. And, really, it should probably just be another page in the StrongLifts 5x5 App, if anything.
. It’s got a very limited market / use case. And, really, it should probably just be another page in the StrongLifts 5x5 App, if anything.
But you know what? I did the thing, and the project took form. I’m taking away a very positive lesson in seeing things through that I hope becomes a standard.
Thank you for reading!